Wednesday 10 October 2018

Hello...I'm back with a tour of my new sewing space.

Just thought I would check in and let you all know I'm still alive, despite my sudden and unplanned absence from the blog since March. To be truthful, my sewing mojo has been MIA and I have had no sewing to share with you, my lovely sewing friends. Also, my wardrobe is rather full and I had no real need for more clothes. Life has been busy and those of you who follow me on Instagram @sewjeanmargaret will know I have been working on a completely different DIY project over the winter months. I have built a raised vegetable garden in our backyard, based on Mel Bartholomew's Square Foot Gardening method. It is now mid Spring and the vegetable garden is growing beautifully. I may do a blog post about it down the track, if you are interested.


Over the weekend, I decided to move my sewing area from the family room, back to the dining room (where it was about three years ago), and move the dining table out to the family room. Here is a quick 360 degree view of my sewing space set up in the family room, before the move.


This was all in an effort to ignite my lagging sew jo. The dining room is a much smaller space, but it is cosy and practical. I have a very efficient work triangle set up between the cutting, sewing and ironing areas and everything is almost in arm's reach. I am feeling excited about getting back into sewing already. Here is my new sewing space after the move.


As you can see, most of the furniture is from Ikea. Hubby shortened the legs on the sewing table so that the machines are at the most comfortable height for me to sew. This certainly reduced the back and shoulder strain I used to experience. Next time I get to Ikea, I plan to buy an L shaped table top that will fit into this corner perfectly, and give me enough room to have all three machines set up on it. At the moment my coverstitch machine is sitting on the draw units. The drawers contain all my sewing machine threads, overlocking threads, sewing tools, machine manuals and accessories etc.I have a lovely view from this window across our back verandah and narrow backyard and into the neighbours palms and banana trees.


This is the view from the kitchen doorway. The large Ikea Kallax unit houses my fabric stash in the pink boxes and my pattern stash in the white boxes. The drawers and cupboards house all my sewing haberdashery.  When I am sewing I will set up my ironing board in front of this unit. The rolling cart houses all my ironing supplies including a sleeve board, point presser/clapper and tailors ham. I have a desk lamp set up on the shelf to shine directly onto the ironing board.


This is the view from the lounge room (you can see the doorway into the kitchen on the left). My custom made cutting table resides in this corner. It is on wheels and can be pulled out into the centre of the room enabling access to all sides when cutting out a project. It also has a shelf underneath for more storage hidden behind the curtain. I have a couple of cheap cork boards from Kmart mounted on the wall above it to display sewing ideas/inspiration etc.


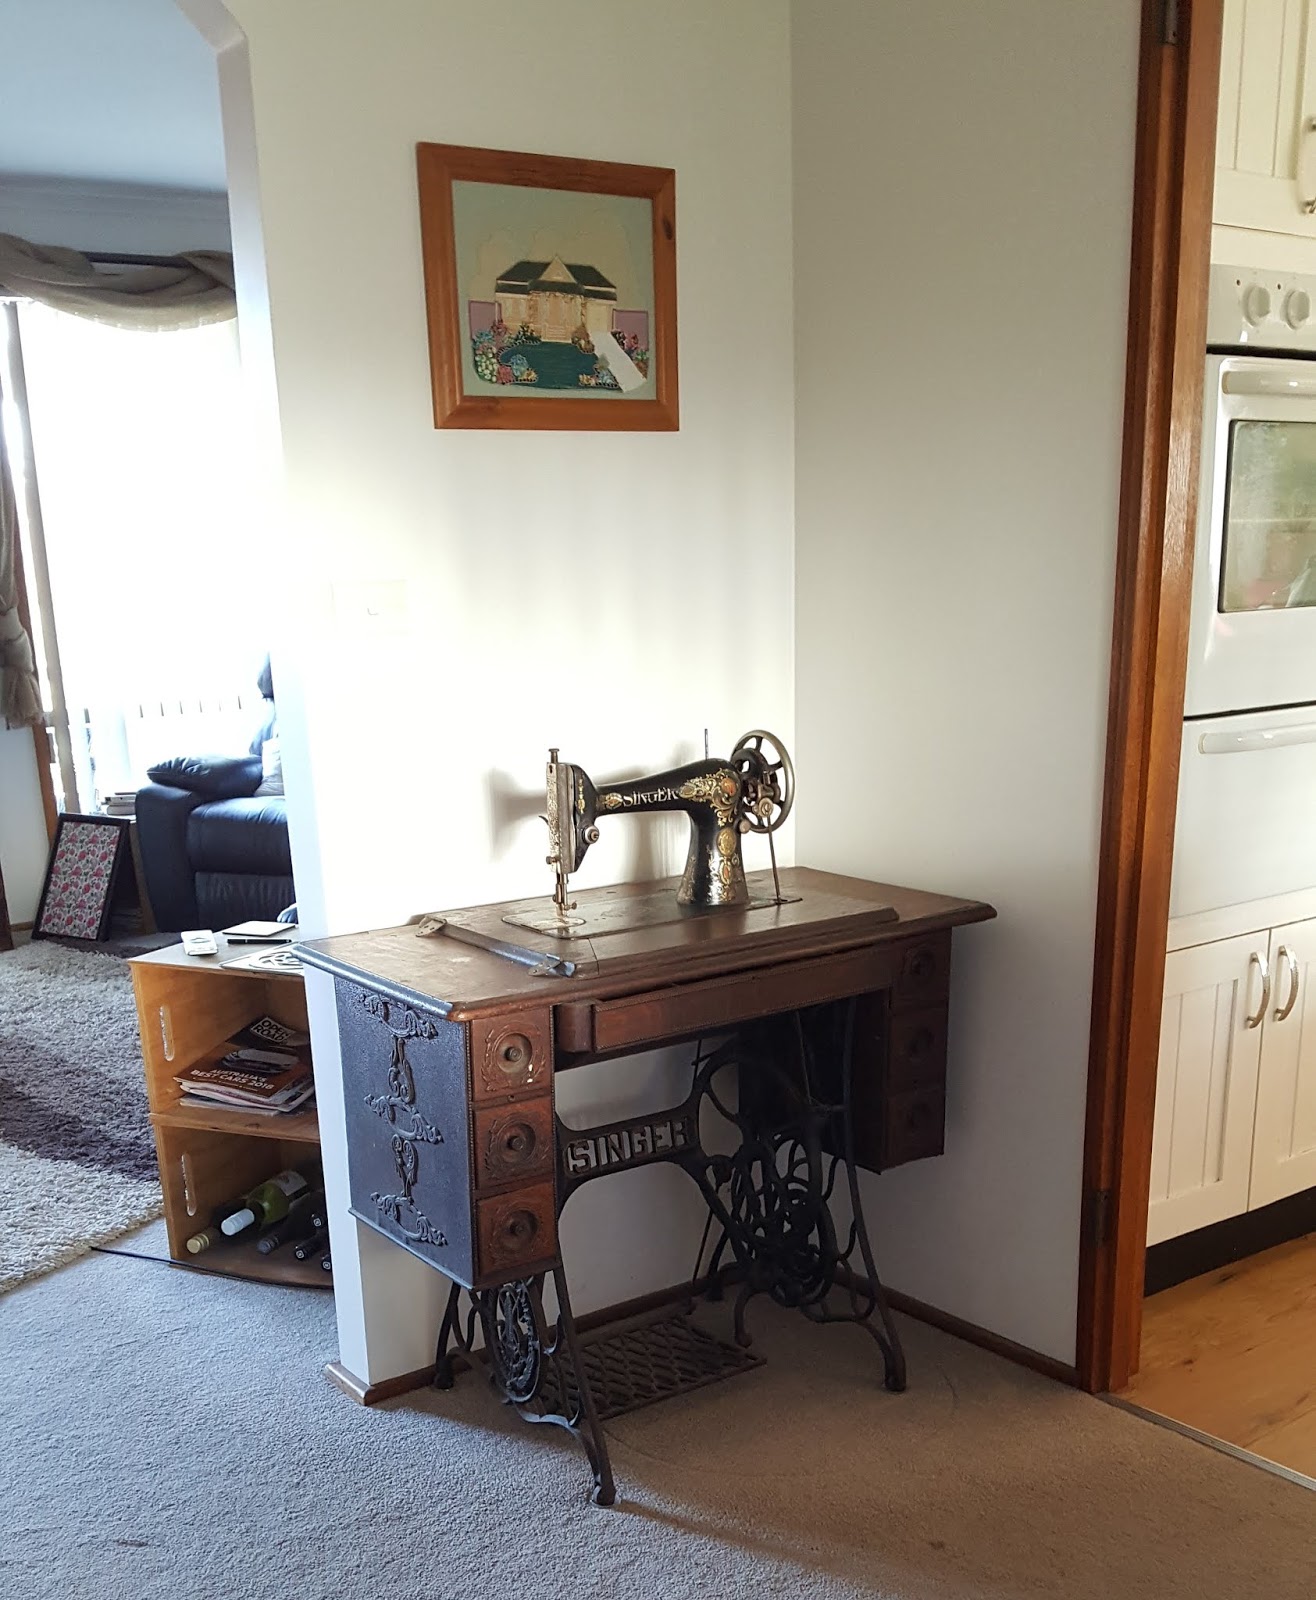
This is the corner between the two doorways in this room...the kitchen to the right and the lounge room to the left. I just managed to squeeze my Singer treadle sewing machine (circa 1910) into this spot by removing the hinged top flap so that I could have the actual machine on show. It's a lovely bit of sewing memorabilia. 


The picture mounted above the Singer is a special bit of fabric and embroidery art that my mother did for me many years ago. It is her interpretation of our house that we (my first husband and I) built back in the 1990's when our children were quite small. It is a little bit moth eaten, but I love it anyway.


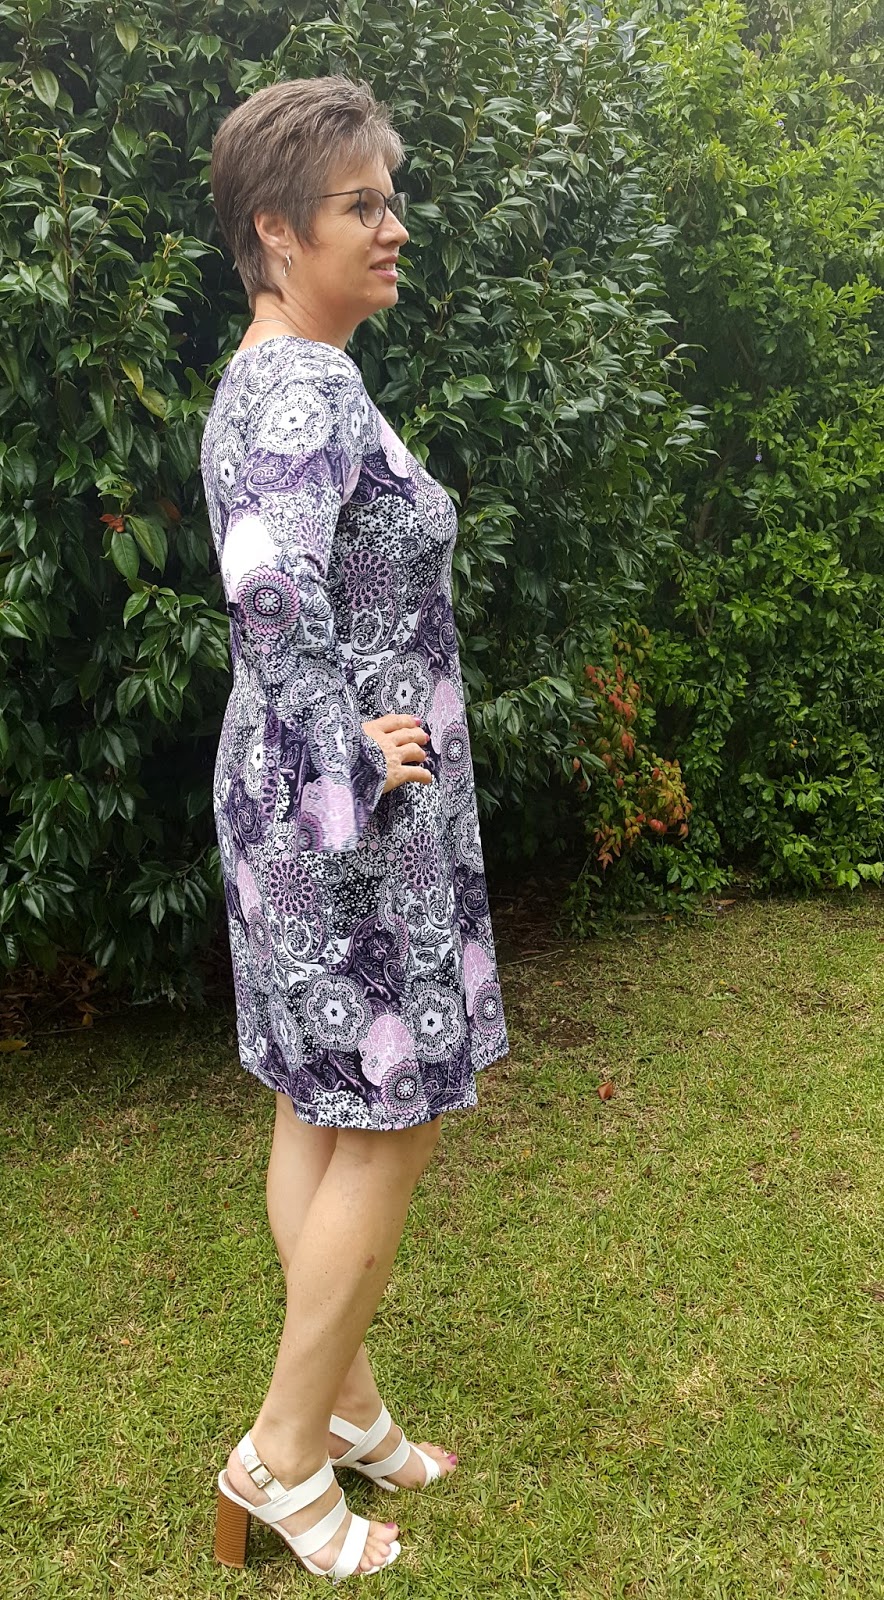
You may have noticed this True Bias Ogden Cami on Vera. I have been trying it out in a knit fabric. I have made a few adjustments and it is yet to be hemmed so I will share the details in a future post, hopefully not too far away.

Happy Sewing

Jean


Saturday 31 March 2018

My First 'Tunic Bible' Dress


My dear son gave me a copy of The Tunic Bible for Christmas 2016. It's a beautiful book filled with all sorts of ideas for making a tunic style top or dress, based on the one multi-sized pattern (which is provided in the book). There are loads of gorgeous photos and a gallery of garments made by some of my favourite sewing bloggers.


It has taken me an awful long time to finally try out this pattern, but I am so glad that I did. I cut a size Medium, based on my measurements, but I did have to run the side seams in to get the fit I wanted. The book does suggest to go down a size if using a knit, so I will do that next time.


The fabric is a poly/spandex knit from Knitwit which I purchased back in their summer sale. It must have sold out as I can't see it on the website today. I was immediately drawn to the fresh and vibrant colours of the print.


I used the front pattern piece with the scoop neckline, finished off with a knit binding, as instructed on page 84. I was a little disappointed that the back pattern piece only had one neckline option, which did not match up with the front scoop neckline, so I had to draw that in myself. The suggested length of the knit band worked out perfectly in this fabric, although it wanted to curl along the edges and made applying it to the neckline a little tedious. But it all worked out well in the end.


I sewed the optional vertical darts in the back which gave a lovely shape to the dress. The front has bust darts which were too high for my bust line, but it's not too noticeable in this busy print thankfully. I plan to lower the bust darts by about 2cm for my next version. I cut the sleeves off at the 'ruffle cuff line' on the pattern, but instead of adding the ruffle cuffs, I drafted my own half circle cuffs using the circle skirt app from By Hand London based on the sleeves from Vogue 8945 which I made last year. The sleeves are self lined which gives them a lovely weight and neat finish. There are no hems or raw edges visible.


Wishing you all a very happy and blessed Easter, and hopefully a little sewing time too.

Happy sewing

Jean

Sunday 25 March 2018

Coco Dress in Jersey Knit for March's MAGAM


Early in March, I posted my MAGAM plans on Instagram. The theme for March is MAD March, which stands for make a dress...something. I decided to make a TNT pattern for me... the Tilly and the Buttons Coco Dress with a few modifications to make it a little different.


Modifications made were: to reduce the flare of the skirt, add vertical darts to the back and to add half circle cuffs to the 3/4 length sleeves. 


The addition of vertical darts in the back give a nice fit and take away from any sack like silhouette. I always reduce the flare of the skirt because I feel it's a bit too flared. I have narrow hips and the narrower skirt looks better on my shape.


I decided to use this lovely poly/spandex jersey print that I bought online from Knitwit in their summer sale. It must have sold out, as I can't see it on their site today. This is not the stable ponte or double knit that is the suggested fabric for this pattern, however, it worked out fine.


I used the circle skirt calculator from By Hand London to draft the half circle cuffs for the sleeves. This was really easy to do and I love the effect. The half circle additions to the sleeves are only a single layer and I opted to leave them unhemmed (raw edge) after experimenting with some scraps. I was never going to be able to hem that curved edge neatly and the wrong side would be on show. I would have self faced the half circle cuffs, but unfortunately there was not enough fabric left for that option.


It has been fun to get back into some selfish sewing, after making some shirts for my son. I'm pretty happy with how this dress turned out and I am realising that I gravitate to wearing dresses much more than separates, so maybe I should concentrate on making more dresses.

Happy sewing

Jean  

Saturday 3 March 2018

Country Blue Houndstooth Fairfield Button-Up Shirt


My son received my second version of the Thread Theory Fairfield Button Up Shirt in the mail yesterday, (you can see my first version here), and he graciously sent me photos so I could see how it fitted.


For this version I went up a size as the first version was a little snug, (luckily still wearable, as it was made in a stretch poplin). I cut a size Medium grading down to a small below the chest. He is quite slim, but has very broad shoulders. I also lengthened the sleeves by 2.5 cm (1 inch) and lowered the button/buttonhole placement by approximately 1.25cm (1/2 inch).


The fabric is called Country Blue Houndstooth shirting from The Remnant Warehouse. It is a poly cotton blend which pressed well but tended to pucker a little when sewing which was a little annoying and made it difficult to get a great finish. I don't know why I don't learn as I had a similar, but worse experience with a polycotton gingham way back in 2014 (by the way, that shirt has had a lot of wear, and is still a favourite in my wardrobe).


I did remember to take a few photos of the shirt before posting it, so here are a few closer shots of the details.


After discussing the fit with him over the phone, the only other change I would make for the next one is to raise the pocket placement by a couple of centimetres, as he felt it was a little low. I'm so glad it fitted well and the changes I made were an improvement on my first version. Now I should be able to make future versions knowing that they will fit without worry.


He was probably way out of his comfort zone asking a fellow student to take these photos for me, hence the absence of a smile, but I am forever grateful.

Now back to some selfish sewing...a dress for me.

Happy Sewing

Jean

Tuesday 6 February 2018

A Polka Dot Grainline Studio Moss Skirt

Grainline Studio Moss Skirt
This is my second time making the Grainline Studio Moss Skirt, and it has been a long time in the making. For those of you who follow me on Instagram, you might remember me posting this half made skirt as my "ufo" in "Sewvember 2016" and it had been hanging around my sewing room for a couple of years before that. I was finally prompted to finish it in November 2016 only to discover that it was too small (not that I was too big, of course) and so it was put in the naughty corner again for another 12 months. I came across it again, last November and decided to try it on as I had lost a few kilos. To my delight, it fitted. All I had to do was sew on the hook and bar and it was finished.


As the making of this skirt has been stretched out over such a long period, all the details have escaped me. You can find my blog post on my first version here if you are interested. I do remember that I sized down for this one and cut a size 10.


The fabric is a cotton canvas from Spotlight, bought several years ago. I'm a little disappointed at how much it wrinkled in the photos. These were taken after a few hours of wear.


Despite being a fun little skirt, I have not worn it very much. I don't think it's the most flattering style on my figure, so I don't feel comfortable wearing it. I might feel different if I wore a loose untucked top (but then all the details of the skirt would be hidden). I probably will not make this pattern again, but I am glad to have finally finished this one.


Happy Sewing

Jean

Sunday 28 January 2018

Thread Theory Designs: Fairfield Button-Up

My two youngest offspring.

My youngest son returned to Medical School yesterday, to begin his second year of study. He will be based at Shepparton Hospital in Victoria, this year, and will be required to wear doctor appropriate clothing, five days a week. I have been promising to sew him a shirt for ages, so I finally thought I had better make good on that promise, especially now that he has a genuine need for decent button-up shirts.

Thread Theory Designs Fairfield Button-Up

The pattern I used was the Thread Theory Design Fairfield Button-Up shirt. I ordered the printed pattern through Pattern Review and was amazed at how quickly it was delivered to me in regional NSW Australia. It comes packaged in a lovely cardboard sleeve. Inside is the multi sized pattern printed on tissue paper. There are pattern pieces for average figures, as well as fuller figures, and also a comprehensive and well illustrated instruction booklet. I also found the online Sew-a-long very helpful.

Thread Theory Design Fairfield Button-Up
I cut a size small, grading down to an extra small for the waist and hips, based on my son's measurements. I also cut a medium length in the body and the arms. My son wanted a fairly slim fitting shirt and that is certainly what he got.


Luckily I used a super stretch cotton poplin from The Remnant Warehouse which has quite a bit of stretch, as the shirt is a little too narrow across the shoulders. As the fabric stretches, it is wearable, but I will size up for the next one. If I had made this in a non stretch fabric, it would have been too uncomfortable to wear.


I didn't make any design changes to the shirt and sewed it up exactly as instructed. The front button band is not a separate piece, which reduces bulk and I really like how it turned out. Not sure if I love the pocket design, but it turned out ok. Apparently Thread Theory Designs offer some alternative pocket designs that can be downloaded for free. I will have to look into this for the next one.


The pattern includes all the usual features of a typical men's shirt including tower plackets. I have had terrible trouble in the past with fusible interfacings that bubble, so I decided to use a sew in interfacing for this shirt, and had much better results. I interfaced the sleeve plackets too as I was concerned that the stretch fabric might be too easily distorted when sewing these. I'm quite pleased with how they turned out. I skipped adding the extra button half way along the placket, as this shirt will most probably be worn with the sleeves rolled up most of the time.


Sleeve tabs are also included in the pattern. This is a handy feature as I just said: the sleeves will be rolled up most of the time. The sleeve length was a little short, despite cutting the medium length, so I will lengthen the sleeves a couple of centimetres for the next one.


The pattern was unusual in that the pattern pieces were cut already graded for the flatfelled seams. This took a bit for me to get my head around, as I am used to trimming the seam after sewing to prepare for the flat felling. Once I worked out how to line up the pattern pieces this method worked quite well.


This shot shows the slim fit of the shirt. I really liked this pattern and will be sure to use it again. These photos were taken in a rush as he was about to leave for the seven hour drive. I didn't have time to wash out all the pink pencil marks on the shirt so I hope he copes ok with that. I gave him a quick ironing lesson the other night, as he will have quite a bit of ironing to do this year. Nice to know that although he is much smarter than me, I can still teach him something.


Happy sewing

Jean

Wednesday 13 December 2017

The Year of the Sleeve

Fabulous sleeves of all shapes, sizes and design have featured heavily in the fashion scene this year. I have made Vogue 8945 to dip my toe into this fun trend.


I have had this pattern for over a year, and now I am kicking myself for procrastinating so long. Vogue rate this pattern as "very easy" and I would agree. On the pattern envelope it is described as a semi fitted dress, with neck and sleeve variations and a back zipper.

Vogue 8945
I made view B with the V neckline and the sleeve flounces, in a size 14. I love the fit of the dress. The back vertical darts give just the right amount of shaping and the front skims across the body without clinging to any bulges. It is quite flattering on my body shape.


The only alteration I made to the pattern was to only add one flounce, and instead of hemming the flounce, I lined it with the same fabric. This eliminated the need to sew a narrow hem and stopped the wrong side of the fabric showing, so was a great solution all round.


The fabric is a printed polyester georgette from Spotlight. I think this is the first time I have sewn with georgette and although it was a little tricky, it behaved quite well. I used a rotary cutter to cut the fabric and this resulted in quite accurate cutting, as the rotary blade does not lift the fabric like scissors can do. I used an invisible zipper and it turned out ok. It is a little wavy, but this busy leafy print is a great camouflage for any wonky sewing.
 

I stabilised the neckline with some narrow cotton tape which worked well, eliminating any stretching of the neckline. I used french seams to create nice neat insides and also because the georgette is a little transparent and I didn't want overlocked seams showing through. I didn't line the dress, but it was necessary to wear a slip underneath. The hem was hand stitched.


These photos were taken in a rush last weekend, just before we left home for my work Christmas party. I think this dress will get a few more wears this festive season. I'm loving those swishy sleeves and I'm thinking this pattern could be easily adapted to make a top too.

Happy Sewing

Jean